
INDICATORS / iETsg0 [Swim & Pool]
iETsg0 [Swim & Pool]
Read Swim, Pool 1–5, and Pilot together. Follow Bull, Bear, and the latest named state to see where the picture agrees, changes, or remains mixed.
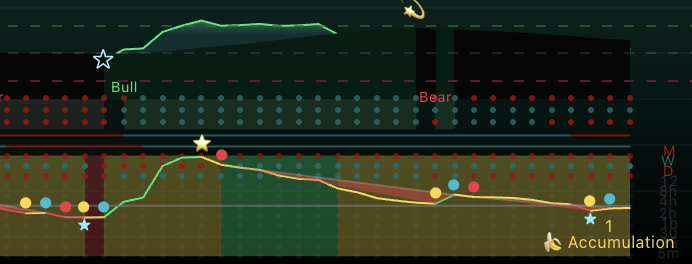
1. Find the four parts of this view
iETsg0 [Swim & Pool] is a separate companion to iETsg0 [One Million]. Read its own display first, then compare both views on the same market and interval.
Begin at the top with Swim. Move down to Pool 1–5, then Pilot and the rows labeled by interval. Finish with the named state in the bottom-right corner. Each part answers a different reading question.
| Part | Where to look | Reading question |
|---|---|---|
| Swim | The upper green line, dark area, and Swim symbols. | Is Swim lifting, holding, or falling back? |
| Pool 1–5 | Three dotted rows followed by two thin lines below Swim. | Do the Pool colors agree or remain mixed? |
| Pilot | The lower colored line with stars and larger colored dots. | Does Pilot strengthen with Swim, or tell a different story? |
| Interval rows and named state | The lower small-dot rows and bottom-right label. | How broad is the agreement, and what is the latest displayed state? |
2. Follow Swim and its symbols
Watch the upper Swim line across several candles. In this image it lifts from the left, holds a higher area, and later eases back. Compare its movement with the dark area beneath it and the Pool colors below.
The lower Swim reference uses ☆, while the upper reference uses 💫. These symbols help you follow one part of the Swim picture to the next. They are not promises that price must change direction.
Swim and Pool can change at different moments. A rising Swim line deserves a second look when Pool still shows red; a falling Swim line deserves attention even if some Pool items remain teal.
3. Read Pool 1, Pool 2, Pool 3, Pool 4, and Pool 5
More teal across Pool shows stronger agreement toward the upward side; more red shows agreement toward the downward side. Mixed colors mean the Pool items are not all saying the same thing.
Near Bear in this image, the top Pool row is red while the next two remain teal. Pool 4 and Pool 5 also show different colors. Read this as a mixed Pool picture, rather than assuming that a Bear label makes every Pool item red.
| Pool item | Appearance | How to use it |
|---|---|---|
| Pool 1 | First dotted row below Swim. | Read its latest color, then compare with Pool 2 and Pool 3. |
| Pool 2 | Second dotted row. | Check whether it agrees with the rows above and below. |
| Pool 3 | Third dotted row. | Complete the three-row comparison before moving to the lines. |
| Pool 4 | First thin line below the dotted rows. | Read it separately; the dots do not describe all five Pool items. |
| Pool 5 | Second thin line below the dotted rows. | Finish the five-part comparison with this line. |
4. Compare Pilot, stars, and colored dots
Pilot is the lower colored line. Follow its shape and color together: a yellow section rising from a low reads differently from a yellow section falling from a high. Compare what Pilot does next with Swim and Pool.
Pilot uses ★ for its lower reference and ⭐ for its upper reference. In the image, the large upper star appears near Pilot’s earlier high, while a lower star appears toward the latest edge.
The larger red, yellow, and aqua dots belong to the Pilot display. Follow the colored sequence as reference moments in Pilot, then observe whether the line continues to improve or fades. These larger dots are separate from the small dots arranged in rows behind them.
Stars and dots may sit close together at this image size. Open the full image and follow their position relative to Pilot before assigning a meaning to a single mark.
5. Read the lower interval rows
The small dots in the lower area have interval labels at the right. M means monthly, W means weekly, and D means daily. The remaining labels show hours or minutes, from 12h down to 5m. These rows are separate from Pool 1–5 above.
Read across a row to follow that interval over time. Read down the latest column to compare intervals at the same moment. Teal and red show different readings; dim or gray rows should not be treated as clear agreement.
When some intervals are teal and others red, the picture is mixed. A stronger reading in one row does not mean all the others have changed. Check which rows are active and visible for your chosen chart interval.
6. Keep Bull, Bear, and the latest state separate
Bull and Bear mark events where those labels appeared. They stay at their respective places in the chart history. The bottom-right label describes the latest named state in the display.
That is why an earlier Bear can coexist with the latest 1 · 🍌 Accumulation. Read the earlier label as part of the chart’s story and the corner label as its current summary. Neither one alone establishes an order in your trading account.
| Displayed name | Color / number | How to read it |
|---|---|---|
| 🍌 Accumulation | Yellow · 1 | A developing picture. Watch whether agreement improves or weakens. |
| 🍀 Market Up | Green · 2 | The display is in its stronger upward state. Check whether it holds. |
| 🐻 Distribution | Orange · 3 | Read the latest Swim, Pool, and Pilot carefully as the picture weakens. |
| 🚗 Market Down | Red · 4 | The display is in its downward state. Watch what changes next. |
- The number identifies the named state. It is not a score, a countdown, or the number of trades.
- Accumulation and Distribution are names used by this indicator. They do not identify who is buying or selling.
- Do not assume the states must appear in numerical order or that Accumulation guarantees Market Up next.
7. Walk through the supplied image
This crop shows the indicator view without price candles, a market name, or the selected interval. The walkthrough explains what is visible; it does not establish what price did next.
- Left — the picture begins to lift: a lower Swim star is followed by rising Swim and more teal Pool dots. Bull appears as the display develops. Pilot also begins to rise in the lower area.
- Middle — stronger agreement develops: Swim holds a higher area, Pilot reaches its upper star, and a green background appears in the lower view. Compare these parts together rather than focusing only on Bull.
- Later — agreement becomes mixed: the upper Swim symbol appears, Bear is shown, and the Pool rows are no longer all the same color. Pilot eases downward after its earlier high.
- Right edge — read the latest state: the lower background is yellow and the corner reads 1 · 🍌 Accumulation. A lower Pilot star and colored dots appear near the latest candles, while several interval rows remain red or dim.
- Overall — improvement has not yet become a clear shared picture again: compare the next Swim movement, all five Pool colors, and Pilot before treating a small lift as a lasting change.
8. Watch three possible next developments
| Possible development | What to observe | How to read it |
|---|---|---|
| Agreement improves | Swim lifts, more Pool items turn teal, Pilot rises, and more active interval rows agree. | The latest improvement is spreading. Watch whether the corner label changes and holds. |
| The lift fades | Swim falls back, Pool becomes redder, and Pilot returns toward its lower area. | The earlier small improvement has weakened. Reassess the current view. |
| Accumulation remains | The corner stays yellow while Swim, Pool, Pilot, and the interval rows remain mixed. | The picture is still developing. The label alone does not decide the next direction. |
9. Use Swim & Pool alongside One Million
- Keep both indicators on the same market and interval when comparing their views.
- Read Swim, all five Pool items, and Pilot here. Then compare Trust, P/H/S/R, Power, and Matrix in One Million.
- If the two views disagree, record what differs and observe the next completed candles. Do not treat one bright symbol as agreement across both indicators.
- For notifications, choose the exact name you want to follow: Bull, Bear, 🍌 ACCUMULATION, 🍀 MARKET UP, 🐻 DISTRIBUTION, or 🚗 MARKET DOWN. These are different events.
- Use your indicator access details and check your display settings. For observations after a candle finishes, select Once Per Bar Close where available.
- Watch when symbols first appear. The latest readings and reference positions can change as the chart develops; a saved image only shows their appearance at one moment.
Need help? Contact support.